
Proven Steps for Installing Colorbond Materials in Guttering Like a Pro
When choosing a guttering system that survives Melbourne’s unpredictable weather, Colorbond materials often come as a top choice. Not only does it resist corrosion, but it also enhances the street appeal, delivering both performance and style. Now that you have decided to choose the Colorbond material for the gutter, the next and most important step is the Installation.
Whether you are a DIY pro or considering hiring a professional, getting a good installation prevents your roof from leaking and helps build a long-lasting system. In this article, we will guide you through the installation process and provide you with everything to know.
Step-by-Step Guide to Installing a Colorbond Roof Gutter System
If you are a homeowner trying to install a Colorbond Guttering, precision is key. Here’s the breakdown for the process:
1. Decide the slope of your gutter: First step is to measure the fascia board where the gutter is placed under. Water should flow towards the downpipe, and the gutter needs to be tilted so that the water runs. Mark a slight slope for a 2 to 3mm drop per metre, using a strong line or level.
2. Install gutter brackets: After measuring the slope line, place brackets to support the gutter. Each bracket should be 60cm apart from the other. Install them securely to the fascia.
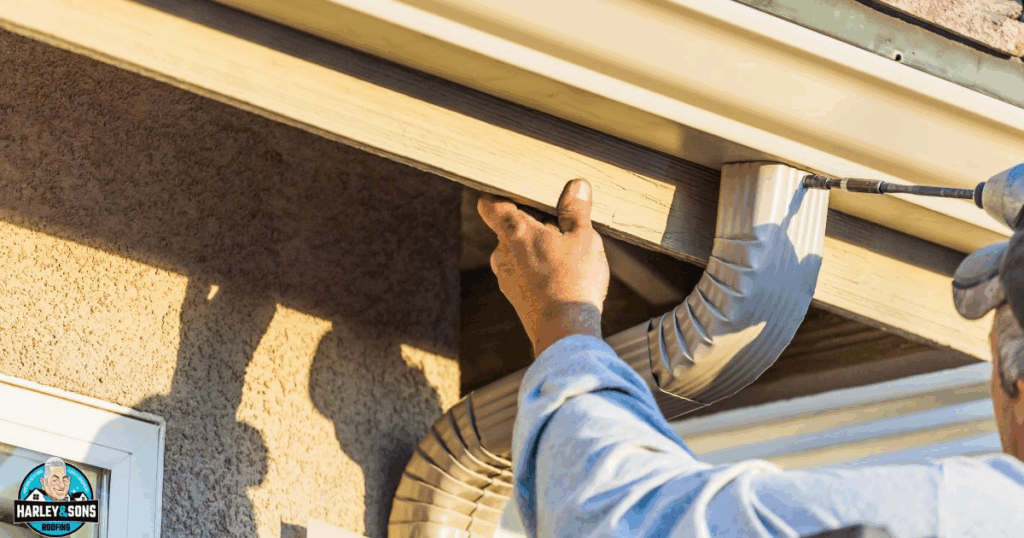
3. Attach stop ends: At both sides of the gutter, fit stop ends to keep water contained. At the joints, use sealant to make them watertight.
4. Join gutter sections: Use joiners to connect multiple gutter pieces. Apply silicone inside the joiner, insert the gutter ends, and secure with rivets. Seal everything well.
5. Fit the gutters into the brackets: Lift the gutter into position and click or fasten it into each bracket. Make sure the slope is maintained evenly.
6. Cut and install downpipe outlets: Mark and cut a hole for the outlet where your downpipe will connect. Insert and seal it with silicone.
7. Attach downpipes: Secure the downpipe to the outlet and wall. Ensure the water is directed away from the home or into stormwater drainage.
8. Test water flow: Run water through the system with a hose to check for leaks and proper drainage.
Essential Tools and Materials for Colorbond Roof Installation
If you’ve decided to install the colrobond gutter by yourself. Here are the right tools and parts you will need.
Tools:
- Tin snips or metal cutting disc
- Rivet gun
- Cordless drill
- Level, tape, and chalk line
- Silicone gun
- Ladder and safety harness
Materials:
- Colorbond gutter sections and accessories
- Downpipes and elbows
- Compatible screws and sealants
- Optional: Gutter guard
Professional Installation vs. DIY Jobs
A YouTube video can teach you a lot about installing gutters, and it is a brilliant way to save money. However, it’s not ideal for first-timers as it requires precision to place parts in place. It’s common to make mistakes in bracket spacing, slope angle, and improper sealing, resulting in water leakage and poor water flow. If you are not confident in installing, hiring a professional could be a great choice.
Professional installers like Harley & Sons ensure every step follows Victorian standards. We calculate slope accurately, install gutters to manufacturer specifications, and use safety equipment suited to working at heights. Most importantly, our work is backed by a warranty for peace of mind. For many Melbourne homeowners, a trusted professional is the safer, longer-lasting choice. Learn more about our gutter replacement service.
Installation Process: Ensuring Proper Drainage with Gutter Brackets
Bracket placements play a significant part in water flow. If they are placed too far apart or not aligned to the slope, rainwater won’t flow properly, and sometimes stays in the gutter, causing molding and leakage.
For a correct placement, start by drawing your fall line (using a level or string) along the fascia board. Place brackets 60cm away from each other and use screws to fasten. Be aware of the gutter’s slope, and fit the bracket accordingly so water can flow towards the downpipe. Misalignment, on the other hand, can let water sit in the gutter or flow backwards, causing sagging, rust, and overflow issues.
Step-by-Step Guide to Installing a Metal Roof With Gutter System
Okay, so now that you have the gutter done, you might consider installing a roof for the next. Installing a full Colorbond metal roof with the gutter is a great choice to best sustain Melbourne’s defeating weather. If you are considering it, here’s our step-by-step guide on installing a Colorbond metal roof with the Colorbond gutter.
1. Prepare the roof frame: Ensure the trusses or battens are straight, level, and properly spaced. The structure needs to support the roof sheets and withstand Melbourne’s wind loads.
2. Install roofing underlay: Roll out sarking or roofing underlay over the rafters. This adds insulation and helps manage condensation.
3. Fix battens in place: Attach battens across the rafters to support the roof sheets. Spacing depends on your roof pitch and sheet type.
4. Lay Colorbond sheets: Start from one side. Overlap each sheet by one rib. Fix them down with roofing screws at every second rib, making sure they’re aligned and watertight.
5. Install flashings: Use ridge capping and barge flashings to seal edges and prevent leaks. Apply silicone at the joins to ensure weather resistance.
6. Fit fascia and gutter brackets: Install fascia board or Colorbond fascia. Then attach the brackets along your slope line.
7. Install gutters and downpipes: Follow the earlier gutter installation steps. Make sure water drains into the downpipes smoothly.
8. Test for proper flow: Hose down the roof and check the entire system for leaks and blockages.
Inspecting Your Roof: A Guide to Maintaining Your Gutter System
Even the best Colorbond guttering needs maintenance. Melbourne’s weather can clog or wear down your gutters over time.
Inspect your system at least twice a year. In autumn, clear out leaves. In spring, check for blockages and wear. Look for peeling paint, sagging, or slow drainage. Hose test your system and clean as needed. Installing gutter guards can help reduce debris buildup.
Wrapping Up
Installing Colorbond materials can greatly improve your home’s guttering and roofing performance – but only if it’s done right. With accurate slope, secure fixings, and watertight joins, your system can last for decades in Melbourne’s challenging climate.
If you’re unsure or want a lasting result, reach out to Harley & Sons. We offer expert advice, licensed installation, and quality workmanship.
Book a free inspection today and see how we can help protect your home with a professionally installed Colorbond roofing system.
FAQs
What are the benefits of using Colorbond materials for guttering?
Colorbond materials are known for their durability and resistance to various weather conditions, making them ideal for Australian climates. They help prevent water damage by efficiently directing rainfall away from the roof.
Additionally, Colorbond is a lightweight roofing material that can be easily installed by DIY enthusiasts, reducing the need for professional roofers.
How do I ensure proper installation of Colorbond guttering?
To ensure proper installation, use appropriate fasteners designed for Colorbond materials and follow the manufacturer’s guidelines. Regular maintenance checks can help identify any issues early, ensuring longevity.
It’s crucial to assess the old roofing before installation. If it shows signs of wear, consider replacing it to maintain optimal performance with the new guttering.
What maintenance is required for Colorbond guttering?
Regular maintenance involves cleaning debris from the gutters and checking for any signs of damage. This helps prevent blockages that could lead to water damage.
Monitoring the condition of the materials and fasteners after heavy rainfall can ensure that your guttering remains effective and durable over time.