What You Need To Know About A Roof Restoration
A roof restoration is usually one of those things someone thinks about when you’ve got problems with your roof. It’s one step better than a bunch of patch repair jobs, and in some cases, it’ll restore your roof back to how it was originally.
But if you’re looking to get it done, do you know exactly what a roof restoration involves?
After all, the roof isn’t a place where you can keep an eye on the workers all the time.
With a lot of dodgy (unlicensed) tradies around Melbourne, it’s important to know what exactly is involved with a roof restoration.
Can You Restore Both Tiled and Metal Roofs?
A roof restoration is usually associated with tiled roofs. The simple reason for this is that we’re able to repair and restore sections of the roof and have the whole roof looking and feeling brand new again.
Patch (repair) jobs can help with isolated areas of the roof, and that’s pretty much it. But a roof restoration will go a step further and give the whole tiled roof a going over.
Now, with metal roofs, you could say it’s technically possible to restore a metal roof; however, because metal roofs are usually installed end to end we would normally recommend a roof replacement.
What Does a Roof Restoration Process Consist Of?
Roof restoration is a crucial process for homeowners looking to extend the lifespan of their roofs and ensure they are protected from water damage and leaks. This comprehensive approach often involves applying roof coatings and sealants, addressing any cracked tiles, broken tiles, or rust, and performing minor repairs to maintain the integrity of the roof. Whether you have a flat roof or a pitched roof, considering a professional roof restoration can significantly improve the insulation and overall condition of your roof.
By opting for a complete roof restoration, you can prevent further damage and enhance the life of your roof, allowing it to withstand the elements more effectively. If you notice any signs of wear, such as moss buildup or roof damage, it’s essential to address these issues promptly. Homeowners should not hesitate to get a free quote to understand the full scope of the restoration process and the benefits it brings to their roof’s maintenance needs.
Step 1 – Stopping the leaks/repairing the damage
Getting to the root of the problems will be the first course of action. For tiled roofs, this can be replacing cracked/broken/damaged tiles, and for metal roofsreplacing the metal sheets, including any screws or fixings.
Step 2 – Pressure Cleaning
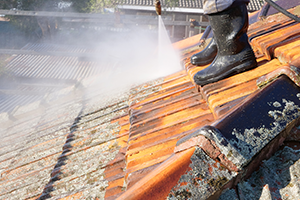
The sheer power of a water blaster will thoroughly clean the roof tiles, especially if the tiles are fairly old. An industrial-strength water blaster is what’s needed here and not your average consumer pressure washer.

If you’ve managed to get up on the roof, have you noticed how the ends of the tiles are black in colour? That area is called a tile nose, and it’s that area that your roof needs to be cleaned in order to carry out the best roof restoration job.
What you may find is some dodgy tradies will avoid cleaning the tile noses simply because they’re afraid of compromising the ceiling cavity – which can lead to further issues down the line.
Step 3 – (Tile) Re-Bedding and Pointing
For most roof restorations, you’ll most likely need to re-bed and re-point.
This is carried out where the angles meet each other on the roof, and a common reason for re-bedding and pointing is that the ridge caps either get damaged or become loose.

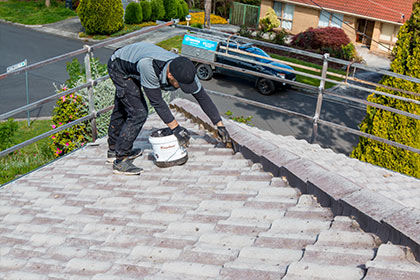
Re-bedding is done by laying a new concrete bed and then laying new ridge caps on the new cement bed. It’s essential to use some bedding rails to get a nice straight bed.
Once the bedding is done and importantly dry, the pointing mortar is ready to be applied. The key is to not apply too thick or thin of a layer and it should be applied with a pointing trowel. Apply a layer too thick and it’ll sag.
Step 4 – Primer
This applies to both tiled and metal roofs, for the former you’ll need a concrete tile primer or sealer and for metal roofs an anti-corrosion primer works best.
With pre-painted roofs, you’ll need much more primer depending on how much coating it had before and how much of that coating was removed.
Step 5 – Top Coats
Using an airless paint machine, spray on the paint and avoid joint marks as much as possible.
With the paint gun angled upwards, it’s essential to cover all areas including the tile noses.
If the roof is rough or bare, then you can go for a 3rd top coat just to increase the coverage and add to the paint thickness.
We’ll also add into this section some manual painting where a paint machine won’t be ideal or can’t reach.
Parts of the roof like barge cappings and lead flashing will most likely have to be hand-painted.
What Other Things Should You Know About Roof Restorations
- Determine whether you need a roof restoration a full-on roof replacement or whether some repairs can cut it.
- For tiled roofs, maybe you want to see the advantages of going from a tiled roof to a metal roof.
- If you’re adamant about having your roof repaired and totally uninterested in restoring your roof or spending more money, you might want to book an inspection by a licensed roof plumber so that they can check for areas that may not be evidently visible to the untrained eye.
- Ensure that the roof restoration plumbers are licensed and insured.
- Weather conditions can decelerate a roof restoration process, even though it’s probably an obvious decision to ensure that there are only sunny days ahead!
- Do you know what brands of products you prefer? Or even what brand of roof tiles? Best to look into this first and discuss this with the roofing company to see if they use them. If not, hear out what they’ll be using or ask if they can use another brand.
- Workmanship guarantees and manufacturer warranties – are you across them all? With regards to workmanship guarantees, anything at least 6 years is good enough but also take a look at the manufacturer warranties. For example, we warrant that our roof restoration 3-coat membrane system won’t flake or peel for a period of 10 years from the installation date.
FAQs
How much does a roof restoration cost?
The cost of a roof restoration can vary depending on factors such as the size of your roof, extent of damage, materials used, and any additional services required. It’s best to get quotes from reputable roofing companies for an accurate estimate.
Will a roof restoration make my home more energy-efficient?
Yes, a properly restored and insulated roof can improve energy efficiency by reducing heat transfer and lowering heating/cooling costs.
Can I choose any type of roofing material for my restoration?
In most cases, you can choose from different roofing materials based on your preferences and budget. However, it’s advisable to consult with roofing professionals to ensure compatibility with your existing structure.
What is roof paint and when should I use it?
Roof paint is a protective coating applied to roofing materials to enhance durability and appearance. You should consider using roof paint if your roof shows signs of wear or fading, as it can help extend its lifespan.
How does a roof sealant contribute to roof maintenance?
A roof sealant acts as a protective barrier against water damage and UV rays, making it essential for regular roof maintenance. Applying a roof sealant can prevent leaks and prolong the life of your roof.
